The Old
My room had JC Penney drapes from the seventies that were showing their age.


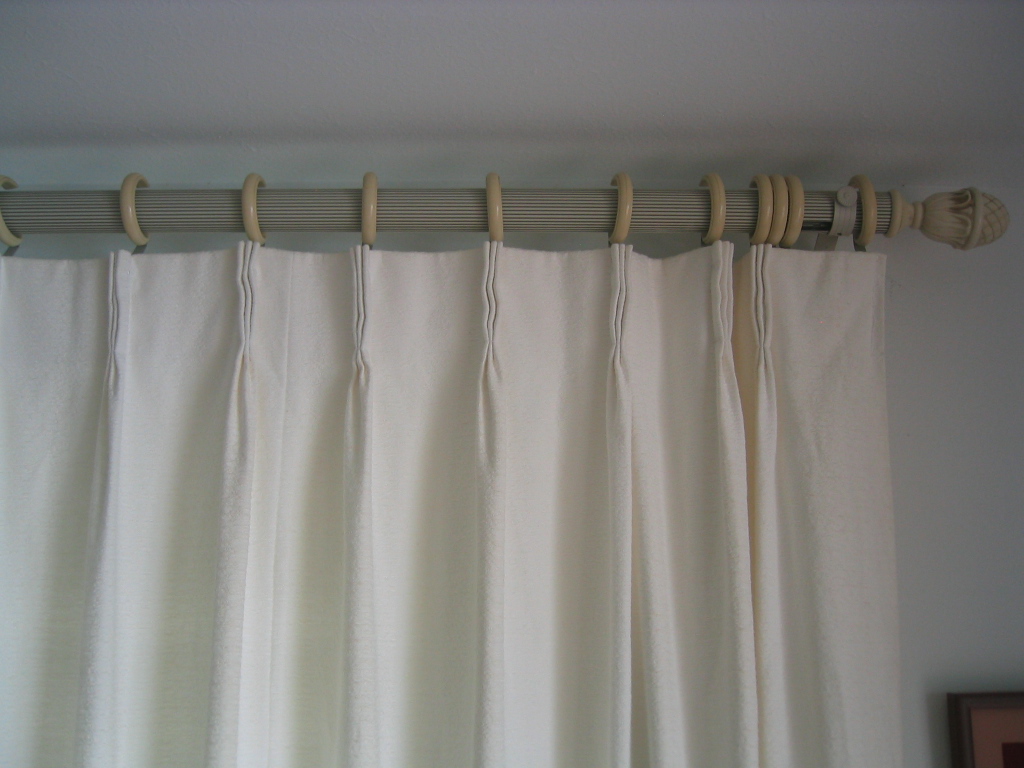

The old drapes had a triple-fold French pleat, rod, rings, and plastic finials. The fabric was medium weight with a white coating on the inside, but not room darkening “black-out” opacity. Metal hooks pierced the center of the pleats and attached to the “rings”, which sat in a half-round track and were operated by a draw cord at one side. The curtains had been washed but the fabric coating separated in places, allowing patches of light to show through.
Replacement drapes were looking like they were from the same era and the rod and track drawcord system hadn’t changed. New drapes were also very expensive, with French pleats, goblet pleats, pinch pleats, buttons, valances, and swags, more in keeping with a centuries-old opera house, not a modern window treatment. Large grommet type drapes looked more like shower curtains in motels. Many styles could not be retracted or could only be held open with tie-backs.
Standard drapery fabrics from most vendors use an assortment of rods and tracks that are “classic” or old-fashioned, with hooks, pleats, grommets, and rings. The rods are bulky and fussy with finials, slide-on pockets or grommets, or large rings and draw cords.
The New
My room has 2 openings: a window and sliding patio door. The window is opened often for ventilation and the door has to be clear of obstruction to open and pass through. Fixed or partially opening drapes would not be suitable.
Kvartal from IKEA [discontinued] offers a contemporary style for window treatments that uses a minimalist system of tracks and brackets.
IKEA’s selection of curtains were either sheer and transparent or dark-colored and mounted on rods. The stiff panels on tracks appeared to not keep out the light when closed and loud patterns looked intrusive when retracted to the side. However, the Kvartal track system looked more appealing than anything else I’d seen.
New drapes had to completely cover the openings for privacy but retract for light and ventilation. Grommets, rods, and finials were eliminated from selection. Kvartal looked clean and modern in the small room but ready-made curtains from IKEA were unappealing or incompatible.
Browsing online and visiting stores for window covering ideas revealed a promising pre-made curtain panel with fabric that was light-colored, not expensive, but had only a rod pocket. The simple curtain panel by Walker, sold at Lowes as Style Selections #308235, fit the bill. At $16.97 per 84″ x 40″ panel, it was one of the least expensive. It came without pleater’s tape for hooks, with just a rod pocket sleeve at the top.


Reviews of the curtain were not overwhelmingly positive. They are advertised as “Energy-saving Blackout curtain”, claiming 25% energy reduction, noise reducing, and 99% light blocking. Reviewers disagreed. I decided to use them anyway.
Slipping these panels on to a rod would not allow them to be retracted. Here’s how I adapted them to the Kvartal sliding track system.
Window
The window opening is 52″ wide x 61″ high. I wanted 2 curtains, 1 each side, to meet in the middle with some overlap. Two 40″ wide panels could cover the opening but how would the curtain expand evenly and stack when retracted? I could see the benefit of some sort of regular pleating to allow the fabric to concertina evenly without bunching or jamming.

The old curtains’ pleat looked a bit formal. I chose a looser pinch pleat style. Adding pleats reduces the finished width so I needed 2 fabric panels per side.
Calculating the size of spacing of pleats: Two panels sewn together made a curtain 78″ wide. The window opening is 52″. I chose 2″ overlap in the middle, 2″ at the outer edge, called return, and a stack-back of 11″ when the drapes are opened. So each side’s curtain had to expand to cover half the window opening plus overlap, plus stack-back, plus return.
Finished width required = 52/2 + 2 + 11 + 2 = 41″
Using 10 pleats per side would result in 9 spaces between pleats.
Each space = total width, minus overlap, minus return, divided by 9 = (41 – 2 – 2)/9 = 4.1″
With 41″ finished width, the pleats would take up the finished fabric width minus spaces, minus overlap, minus return, divided by 10, i.e. (78 – 41 – 2 – 2)/10 = 3.3″ per pleat.
So a layout of 2″ at the edge, then alternating 3.3″ pleat with a 4.1″ space, then end with another 2″ edge would yield a 41″ wide finished pleated curtain.
An easier layout option is to make pleats and spaces equal length. e.g. 78″ material divided into 9 spaces plus 10 pleats, plus overlap, plus return. If z is the space and pleat size, 9z + 10z + 2 + 2 = 78, so z = 3.9″ for each space and pleat.
So much for the calculations. Now I could pin out the spaces and pleats ready to stitch.
Removing the curtain packaging revealed how wrinkled the fabric had become while folded and stuffed into their tight bags. These curtains are 100% polyester and care instructions say hand wash, mild soap, no bleach and do not iron. After some time being left unwrapped it was clear the wrinkles were not going away by themselves. I decided to iron them using a damp cloth between the fabric and the iron, set on temperature for wool. It worked well to remove the fold lines and other wrinkles without damaging the fabric or “block-out” coating but was also time-consuming. The most effective technique was to press down hard and move the iron slowly.


I stitched 2 panels lengthwise to create 2 curtains from 4 panels.
The first couple of attempts to layout the pleats and spaces resulted in the panel’s seam getting in the way of a pleat. I concluded that starting from the seam in the center of a space and pinning the first pleat 1.95″, then space-pleat at 3.9″ each would solve the problem.

Pins placed from panel seam joint for 3.9″ pleats and spaces.


Next I brought the pins of each pleat together and stitched the top about ¼” forward and back 3 times. The final width came out perfectly, with 2″ on each side.

The next step is to add the track hooks. The box of 24 Kvartal glides includes 2 glide stops and 24 small nylon hooks that can be placed on pleater’s tape or, in this project, sewn into each pleat. In order for the space to fold back below the track when the drapes are closed, the hook must be placed no more than ¾” below the top of the fabric but not much higher, in order to hide the track slides.
I set the sewing machine to zigzig, zero stitch length, and treadle position to just over top center ready for down stroke to the right.

Fold the fabric back over the pleat and line up the edges so that there is ¾” to the right, and the front edge is just under the needle. It is important to be consistent and accurate so that the top edge will hang evenly.

Lower the presser foot and do one stitch down, leaving the needle in the fabric.
Raise the presser foot, separate the pleat layer and place the Kvartal hook’s spur against the needle. Lower the presser foot down onto the fabric and hook. Sew 10 stitches over the spur. The hook may need some jiggling to allow the needle to pass each side of the small spur.


Repeat for each hook at every pleat.
The curtains are now finished ready for hanging.
Mount curtain track
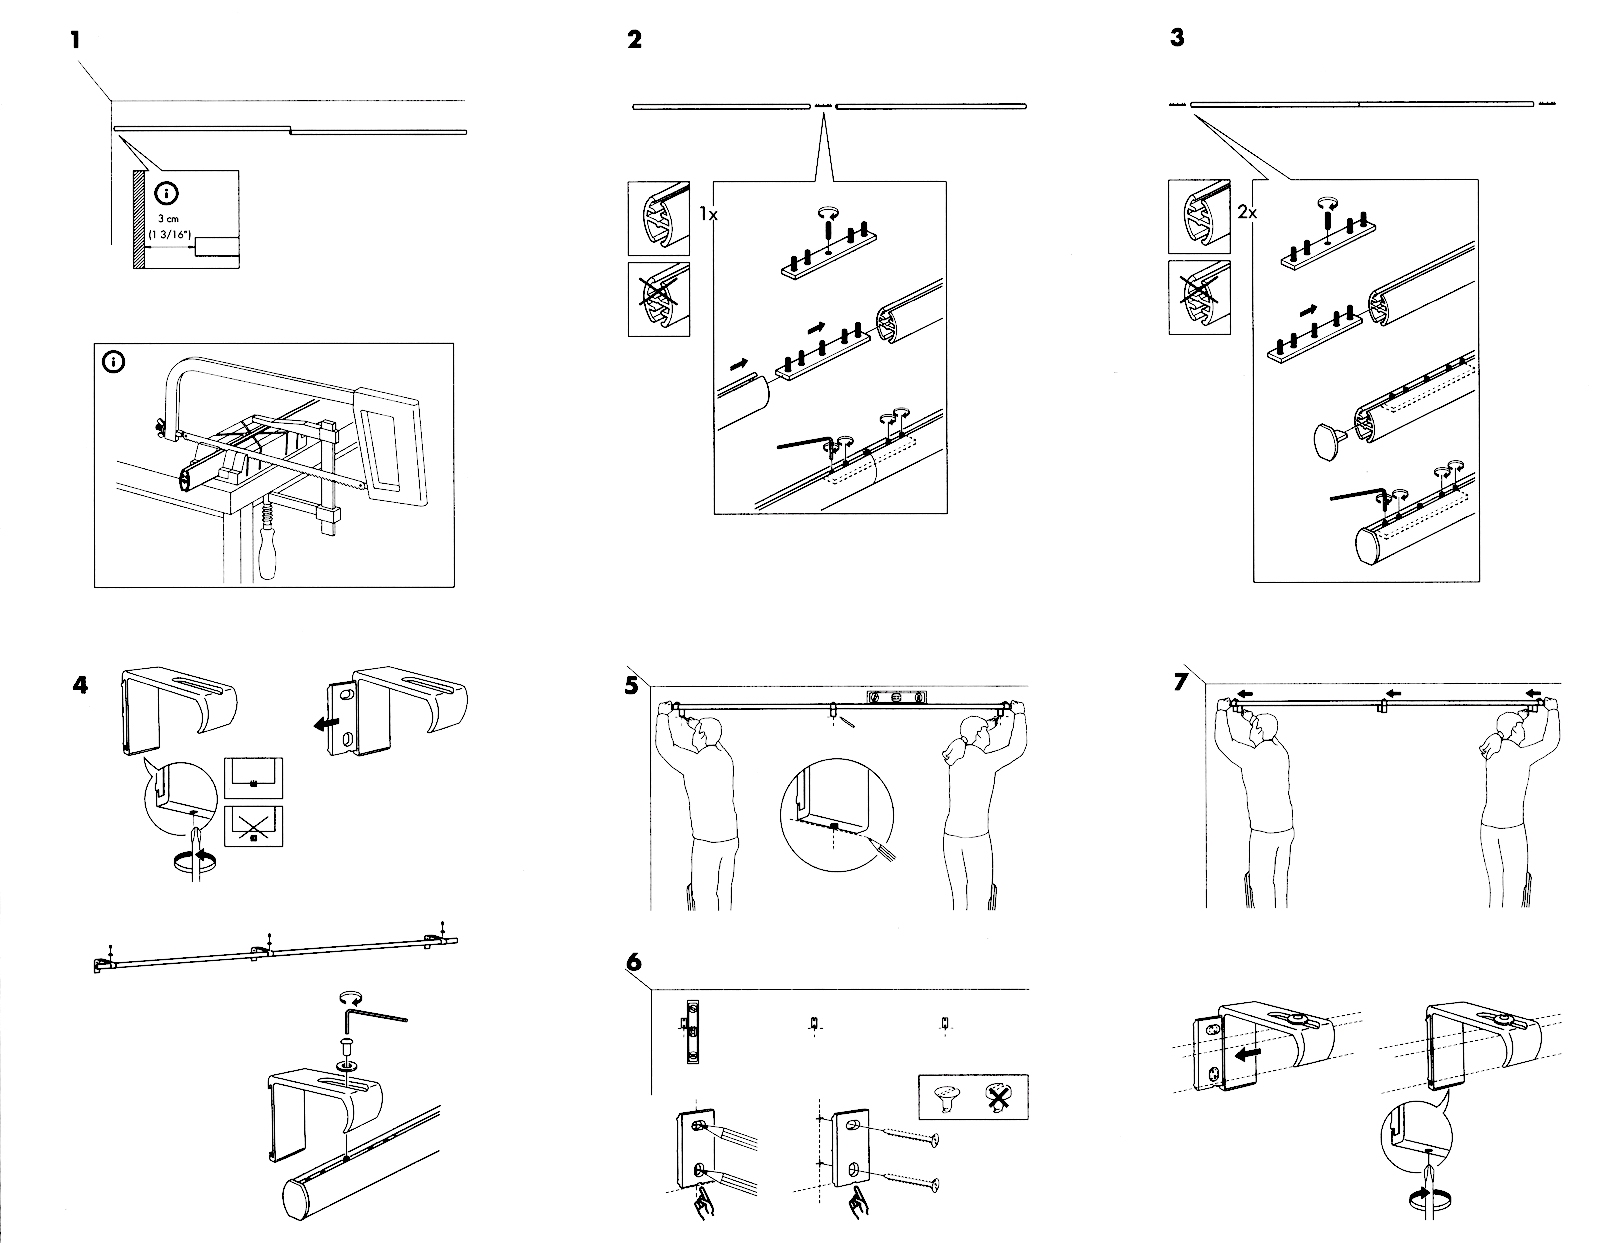
IKEA’s instructions for Kvartal assembly are minimalist pictographs. So while the parts are identifiable and steps are a sequence of diagrams, implementation requires careful planning and measurement before cutting the tracks to the right length and drilling holes in the wall for the brackets.
The finished curtain width is now 41″ per side. With 2″ overlapping in the center of the window, and 2″ return to the wall, the track needs to be 41″ + 41″ – 2″ – 2″ – 2″ – 2″ = 74″ long. The tracks are sold in 55″ sections, so I needed to cut down 2 sections and join them together to be 74″.
To place the joint at the middle bracket, I cut each section down to 37″. The miter box helped hold the track while using the hacksaw but it does not guarantee a smooth or straight, square cut. To avoid an unsightly joint, I placed the hand cuts at the outer ends where the end-caps cover them up, and used the factory machine cuts to be at the joint in the middle.

The plastic end-caps are very hard to remove by hand. To assist removal, I slid the joining or bracket attachment plate to near the end-cap, tightened it down in the track, and used a small screwdriver in the gap to lever off the cap.

Track height:
I measured floor to ceiling height and deducted curtain length, and allowed some clearance off the floor. e.g. 88″ – 84″ – 1½” = 2½”
This is the distance the bottom of the track should be below the ceiling. A screw holds the track to the bracket from the top, and the bracket slides onto a mounting plate attached to the wall. The mounting plate lower edge is 2″ below the track groove. So I placed the mounting plate lower edge at 2½” + 2″ = 4½” below the ceiling. (I used 1″ allowance for floor clearance but found it was not quite enough to stop parts of the curtain dragging on the floor, due to slight variations in my hook placement, and panels of longer length than advertised).

Space the bracket mounting plates so that one is at the center of the window opening and the others end up 3″ from the ends of the track, that is, 34″ from the center joint. Mark the wall with a pencil spot at the bottom of the mounting plate then position the plate above it. Mark the screw holes and then drill 3/16″ diameter holes. Hammer a wall anchor into each hole and screw the plates in using a bubble level to ensure they are vertical.


The IKEA instructions suggest assembling the track and brackets then sliding the 3 brackets simultaneously onto the mounting plates. This could work if the mounting plates are exactly in the right place. If not, then the brackets will be difficult to line up all at once and the final position of the brackets may not be flush on the sides of the mounting plates. I tried this way first but couldn’t get everything lined up.
An alternative way is to tighten down the plate that joins the two tracks and screw down the center bracket onto it, but leave the end bracket track plates loose enough to slide. Place the end brackets on to their wall mounting plates and screw in their grub screws just enough to stop them slipping off. Holding the track in the center, slide the center bracket on to its mounting plate and secure its grub screw. Go to each end bracket and slide the track’s plate to align the center screw with the bracket mounting slot and insert the top screw.


Then tighten the plate’s outer screws within the track. When everything is aligned, snug all the screws up tight.
Either way, there is not much tolerance for inaccuracy and no way to adjust for errors in measurements.
Next, slide in a track glide, an end stop, more glides, another end stop, and glide, and replace the plastic end-caps. I tightened the end stops at 1″ from the track end.

I placed the curtain hooks onto the slides and attached draw rods to the center slides.


Finished window treatment:


This modern window treatment would work well for French door curtains as well.
Materials:
Lowes fabric:
84″ by 40″ panels 4 $16.97 ea
Thread $ 2.29
IKEA Kvartel:
140cm single tracks 2 $ 5.99 ea
7cm brackets 3 $ 2.50 ea
24-pack glides & hooks 1 $ 2.00
Draw rods 2 $ 2.00 ea
Hardware:
1″ #6-8 wall anchors 6 $ 0.08 ea
1¼” #8 flathead screws 6 $ 0.10 ea
Total Cost: $96.73 + sales tax & transport
Time: one day to make, one day to install.
Sliding Patio Door
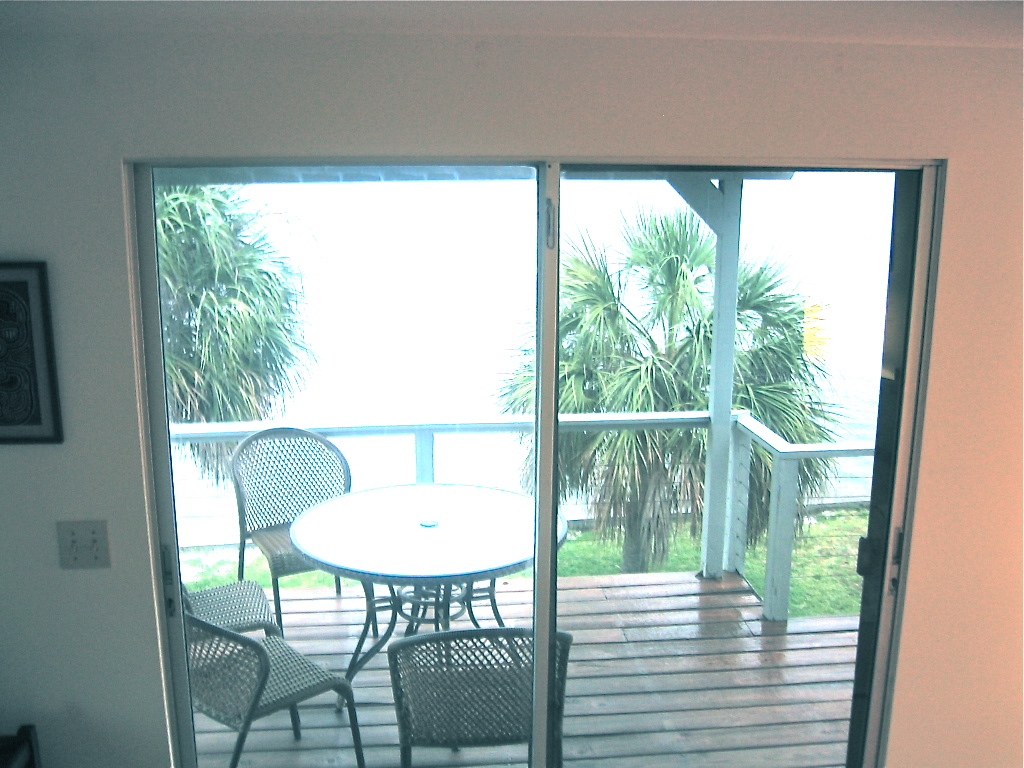
The sliding door opening is 72″ wide by 78″ high. With limited wall on the left, and a light switch, I wanted the drapes to be one piece and stack to the right. The pleats and spaces had to match the window described above. I would need to cover the 72″ opening, plus some overlap on the left wall, plus stack-back and return on the right. Allowing 3″ overlap, 2″ return, and 15″ stack-back, the finished curtain needs to extend to 72″ + 3″ + 2″ + 15″ = 92″.
Five 40″ panels stitched together with 1″ seams adds up to 192″ wide. Subtracting overlap and return 192″ – 3″ – 2″ = 187″, and with 25 pleats/24 spaces results in 187/49 = 3.8″ for each pleat and space, close enough to look the same as the window style, which used 3.9″ spacing.
After the fabric was joined, pleated and hooked as described above the overall width is 92″ including overlap and return. I chose 94″ for the length of the track and cut the tracks down to 47″ each. I figured I could cut the tracks shorter later if necessary, but I couldn’t make them longer.
Since the stack-back was all on the right I offset the track and brackets from the door’s center so that there was 3″ overlap with the wall on the left, measured and marked the track’s center point for the middle bracket position. Allowing 3″ each end for the track to overhang, I measured from the center bracket position 44″ each way to mark the left and right bracket locations.
The brackets and track were installed as described above and 25 slides, one stop, and draw rod added, and curtains hung.
Finished door treatment:


Materials:
Lowes fabric:
84″ by 40″ panels 5 $16.97 ea
Thread $ 2.29
IKEA Kvartel:
140cm single tracks 2 $ 5.99 ea
7cm brackets 3 $ 2.50 ea
24-pack glides & hooks 1 $ 2.00 (plus 1 spare slide and hook from window pack)
Draw rod 1 $ 2.00
Hardware:
1″ #6-8 wall anchors 6 $ 0.08 ea
1¼” #8 flathead screws 6 $ 0.10 ea
Total Cost: $111.70 + sales tax & transport
Time: one day to make, one day to install.
Tools:
sewing machine and straight pins
hacksaw
miter box (optional but helpful)
drill and 3/16″ drill-bit for anchors
hammer
screw driver
tape measure
step ladder
bubble level (optional but helpful)
The good:
The combination of Kvartal track and sliding curtains with pleats worked well. There was no ready-made solution available and the end result fulfilled my requirements to replace old drapes inexpensively and with a modern style.
The not so good:
The fabric was very wrinkled and time-consuming to iron smooth.
The fabric had a slight odor like bleach or paint but was not offensive and gradually dissipated.
The panels varied in length from under 84″ to over 85″. One panel was quite a bit longer than standard, which caused difficulty joining and aggravated hanging height.
My track was installed not quite high enough to allow the fabric to clear the floor, which prevented the curtain draping freely.
These curtains are not “blackout” but they are good enough to reduce bright sunlight and be room darkening.
I can’t vouch for their noise reduction or energy saving claims.


2 replies on “How to Make Pinch Pleat Drapes For Modern Window Treatment”
I am so grateful for this tutorial! I couldn’t figure out how to get those darned end caps off. My strategies to remove them were unsuccessful, and I was damaging the merchandise. Your method made removal so easy! Why couldn’t Ikea include that valuable bit of info in their microinstructions?
I’m glad you found that helpful. I struggled with them too.